Jump to a question in this guide
- Why can two stucco homes need different repairs?
- What is the wrap doing before the stucco covers it?
- Why is metal mesh visible on an unfinished wall?
- What changes between the scratch coat, brown coat and finish?
- Does a sprayed surface tell me the wall was done properly?
- How is EIFS different from stucco over metal lath?
- Where should rain go around a window?
- How does water leave behind the finish?
- Which visible changes deserve a closer look?
- When might a surface repair be the right kind of work?
- Why can a repaired patch still stand out?
- What should a new-build buyer ask before the wall is covered?
- What should a buyer make of “the stucco was repaired”?
- When is a closer enclosure investigation useful?
- Why do exposure and renovation plans matter?
- What are the most useful questions to take to the inspection?
- A stucco-looking finish does not identify the whole wall.
- Recognize the stage before judging exposed reinforcement.
- Follow rain past the finish, through opening details and back outside.
- Match a proposed repair to the cause and layers affected.
- Keep the work and its photographs tied to the actual location.
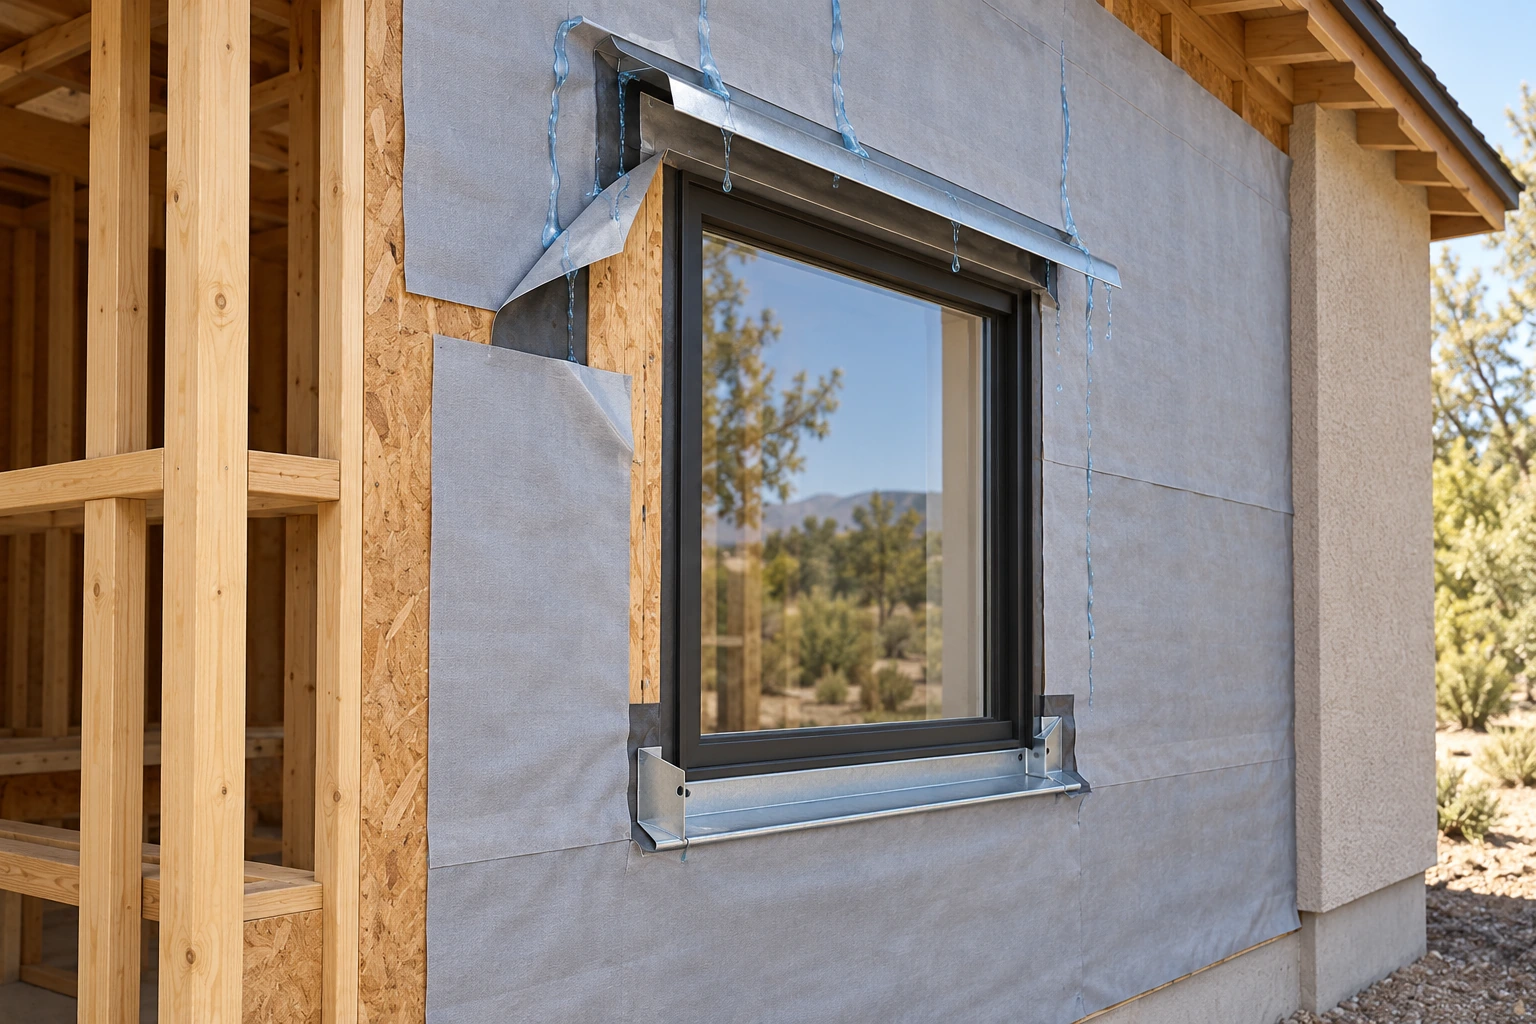
The wrap is the water-control layer behind the stucco. Around the window, it has to connect with the opening details so water can be directed back outside. The peeled-back edge makes those separate pieces visible; it is not a complete installation detail.
About this illustration
The opening connections are simplified; use the actual wall detail for the real construction.
10 picture lessons appear beside the questions in this guide. Use them to understand the explanation, then consider what it means for your home.
Why can two stucco homes need different repairs?
The expensive part of a stucco problem may be behind the surface you can see. A small patch can be the right response to an isolated damaged finish. It is a different job from correcting a window connection that keeps letting water into the wall. Before you accept ‘the stucco was repaired,’ understand which of those jobs was actually done. The pictures below follow one cement-stucco example from the wrap to the finished texture, then compare it with EIFS and several repair situations.
Stucco is the textured outside surface you recognize, but the wall behind it may be quite different from the one next door. Traditional cement-based stucco can be supported by metal lath. An exterior insulation and finish system, usually shortened to EIFS, has a reinforced coating over insulation. Both can have a similar final texture. They do not become the same assembly because an advertisement calls them both acrylic stucco.
That difference matters when someone quotes a repair. A hole might affect a finish coat, the supporting base, reinforcement, insulation or the water-control layer farther back. The repair has to suit the actual materials and the reason the opening developed. A product that fills one shallow surface defect is not automatically a replacement for the layers or connections beneath it.
Ask the seller or builder to identify the system and the area it covers. Additions, reclad elevations and replacement-window areas may differ from the original house. A wall drawing, identified product documents and photographs taken before it was covered are more useful than guessing from colour or tapping the finish. Leave the surface intact; do not make a hole to identify it yourself.
Use the first whole-wall picture to put the parts in order. The later close-ups explain one job at a time. The drawings are examples of how the parts relate, not specifications for your wall.
What is the wrap doing before the stucco covers it?
The wrap is a water-control layer behind the cladding. You may also hear it called a sheathing membrane or water-resistive barrier. Its useful job is to manage water that gets past the outside finish before that water reaches moisture-sensitive backing. Some systems use sheets; others use a specified coating. A green, black or white colour does not identify the product or prove that its connections are complete.
Think about rain arriving halfway up the wall. The outer finish sheds much of it. Water that passes the finish needs a route down the intended water-control surface and out at the designed exit. The wrap cannot do that job if a connection sends water behind it or if the route ends at a trapped pocket. The important question is where the water goes next.
An opening makes the route more complicated. A window cuts through the otherwise continuous wall. The wrap, sill treatment, head flashing and surrounding connections have to work together. Photographs showing only a broad sheet of wrap do not necessarily show those junctions. Ask for the view at the actual window, vent or transition you are trying to understand.
This picture deliberately exposes a few parts so you can see their relationship. A builder's drawings and the identified system instructions establish the real layer arrangement, connections and details. There is no universal sheet colour, number of sheets or tape detail supplied here.
The wrap manages water behind the outer finish
The wrap is the water-control layer behind the stucco. Around the window, it has to connect with the opening details so water can be directed back outside. The peeled-back edge makes those separate pieces visible; it is not a complete installation detail.
Choose a part name to highlight its explanation below.
- Wrap
The water-control layer sits behind the outer finish.
- Opening
Window connections must direct water back outside.
- Backing
The wall behind the wrap remains a separate layer.
About this illustration
The opening connections are simplified; use the actual wall detail for the real construction.
Why is metal mesh visible on an unfinished wall?
Metal lath is the reinforcement and support you can see before wet cement plaster covers it. Expanded-metal lath has small diamond-shaped openings; other specified lath forms exist. It is not simply decorative wire. Plaster goes into and around its openings so the hardened base has a mechanical connection to that support.
The close-up shows why the lath is not just a flat pattern printed on the wrap. Space around its strands allows the plaster to surround them. Attachment, accessories, backing and the actual system detail all matter to the completed work. The drawing leaves out fastening measurements and does not tell a homeowner how to install or adjust lath.
Bare lath across a wall may be completely expected when the contractor is preparing for the base coat. Bare reinforcement appearing through a supposedly completed finish is a different observation. It could be an unfinished area, impact damage, a repair opening or another problem that needs an explanation. First establish which stage you are looking at.
For a new-build visit, ask: “Is this area waiting for its next coat, or is this being presented as finished?” Record the answer and the location. Do not label an entire house badly built because one construction-stage photograph shows wire. Equally, do not accept an unexpected opening in a finished wall as merely a texture choice.
Metal lath supports the cement-plaster base
The metal lath has openings that let the wet base coat surround its strands. This is an unfinished stage, so the broad exposed mesh is expected. The small plaster sample shows the relationship; actual attachments and backing must follow the identified system.
Choose a part name to highlight its explanation below.
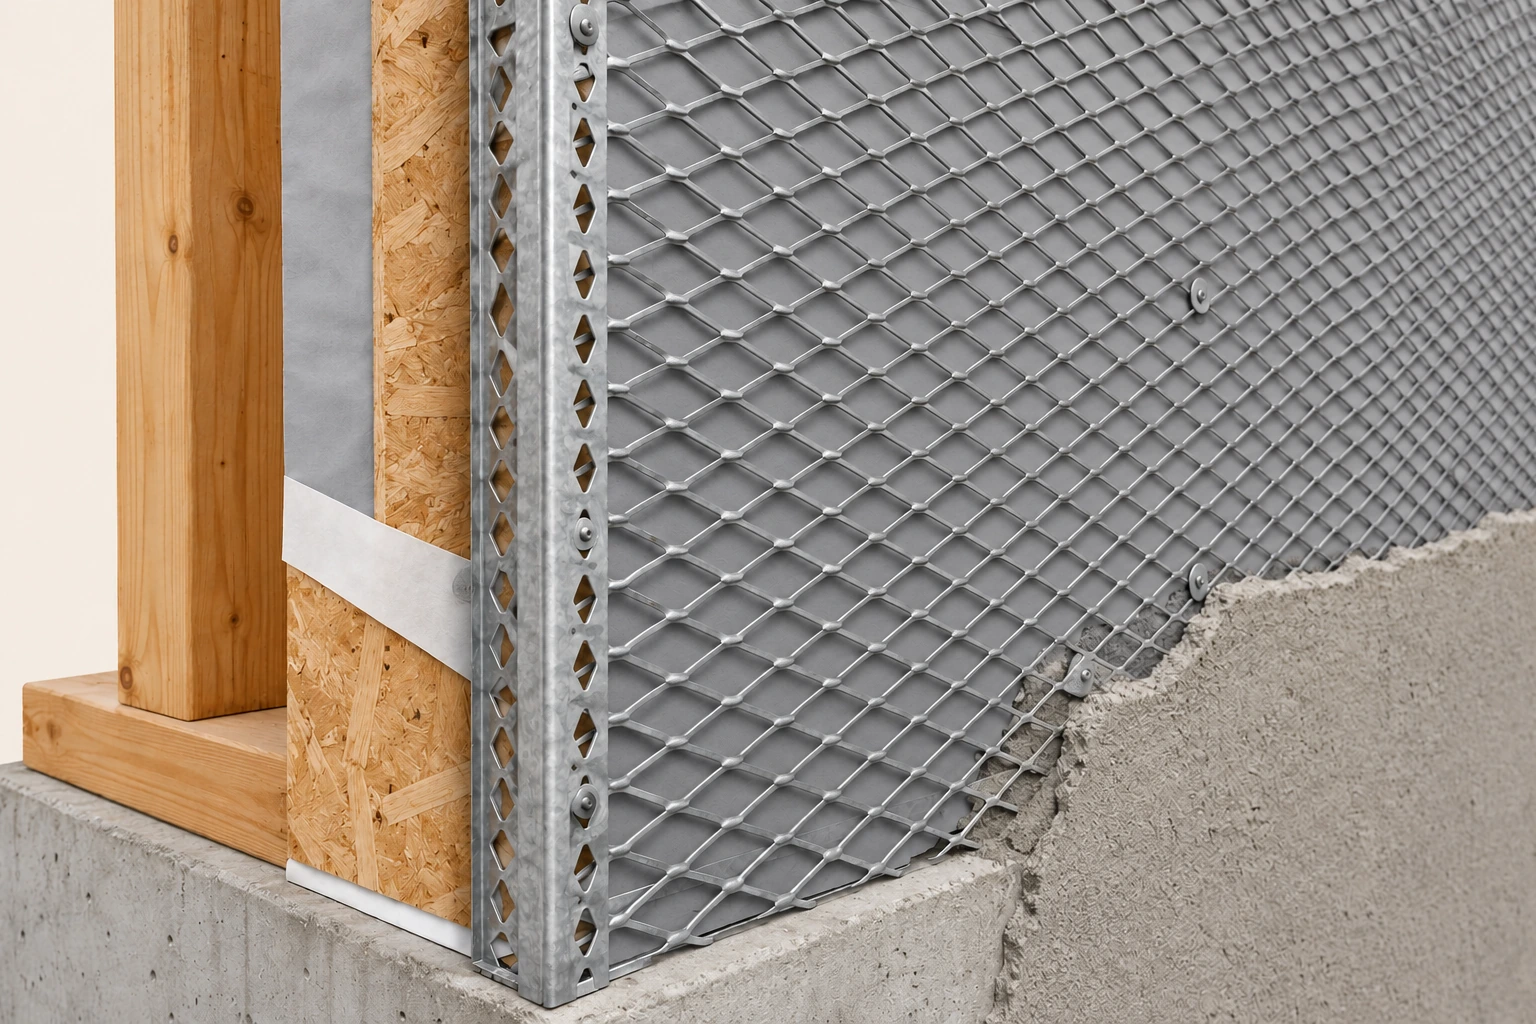
- Metal lath
Expanded metal supports the cement plaster in this illustrated system.
- Openings
Seeing lath before the coat is a construction stage.
- Stage
Ask what work is complete rather than calling every exposed stage a finished-wall defect.
About this illustration
This is an unfinished material sample, not an attachment or installation detail.
Exposed reinforcement: establish the stage first
- Broad bare lath on an unfinished wallThe base coat may not have been applied yet. What stage is complete, and what comes next?
- An irregular opening in an otherwise finished surfaceMaterial may be missing or an area may be intentionally opened. Why is it open, which layers are affected, and what work is planned?
- A stain or crack beside the openingIt adds a location to investigate; it does not identify the cause. Was this particular area included in the investigation?
The illustration is a stage comparison, not a workmanship diagnosis from a photograph.
Further reading: QUIKRETE — Scratch and Brown Base Coat Stucco, product 1139-60/-80 technical data; QUIKRETE — Stuccoing systems project sheet; BC Housing — Maintenance Matters 8: Cladding.
What changes between the scratch coat, brown coat and finish?
In the traditional three-coat example, the first cement-plaster layer is the scratch coat. It surrounds the lath and has a deliberately scored surface. Those grooves are part of that stage; they are not intended to be the final decorative appearance. The next layer is the brown coat, which builds and levels the base for the finish.
The finish coat provides the selected exterior colour and texture over that prepared base. A rough, swirled or relatively smooth surface is a finishing choice, not proof of which concealed layers were installed. A colour difference between repair and old work can be an appearance issue even where the repair materials are appropriate. Appearance and water-control performance are different questions.
Not every cement-stucco system follows this exact three-coat sequence. Manufacturers also describe other configurations for their named products and backing. EIFS has its own base-coat-and-mesh arrangement. Ask which system was specified rather than trying to count coats from a distant photograph of the finish.
Cement-based coats also need suitable curing and protection. The named base-coat manufacturer explains that job and climate conditions affect the curing approach. A dry-looking surface does not document that history. Ask the contractor about the specified materials, installation conditions and completed-work records; do not use this illustration as a timing, thickness or mixing recipe.
From exposed lath to the finished texture
In this traditional three-coat example, the scratch coat surrounds the lath and has a scored surface. The brown coat builds and levels the base; the finish supplies the selected texture. Other systems use different configurations, so identify the specified system before judging its stage.
Choose a part name to highlight its explanation below.
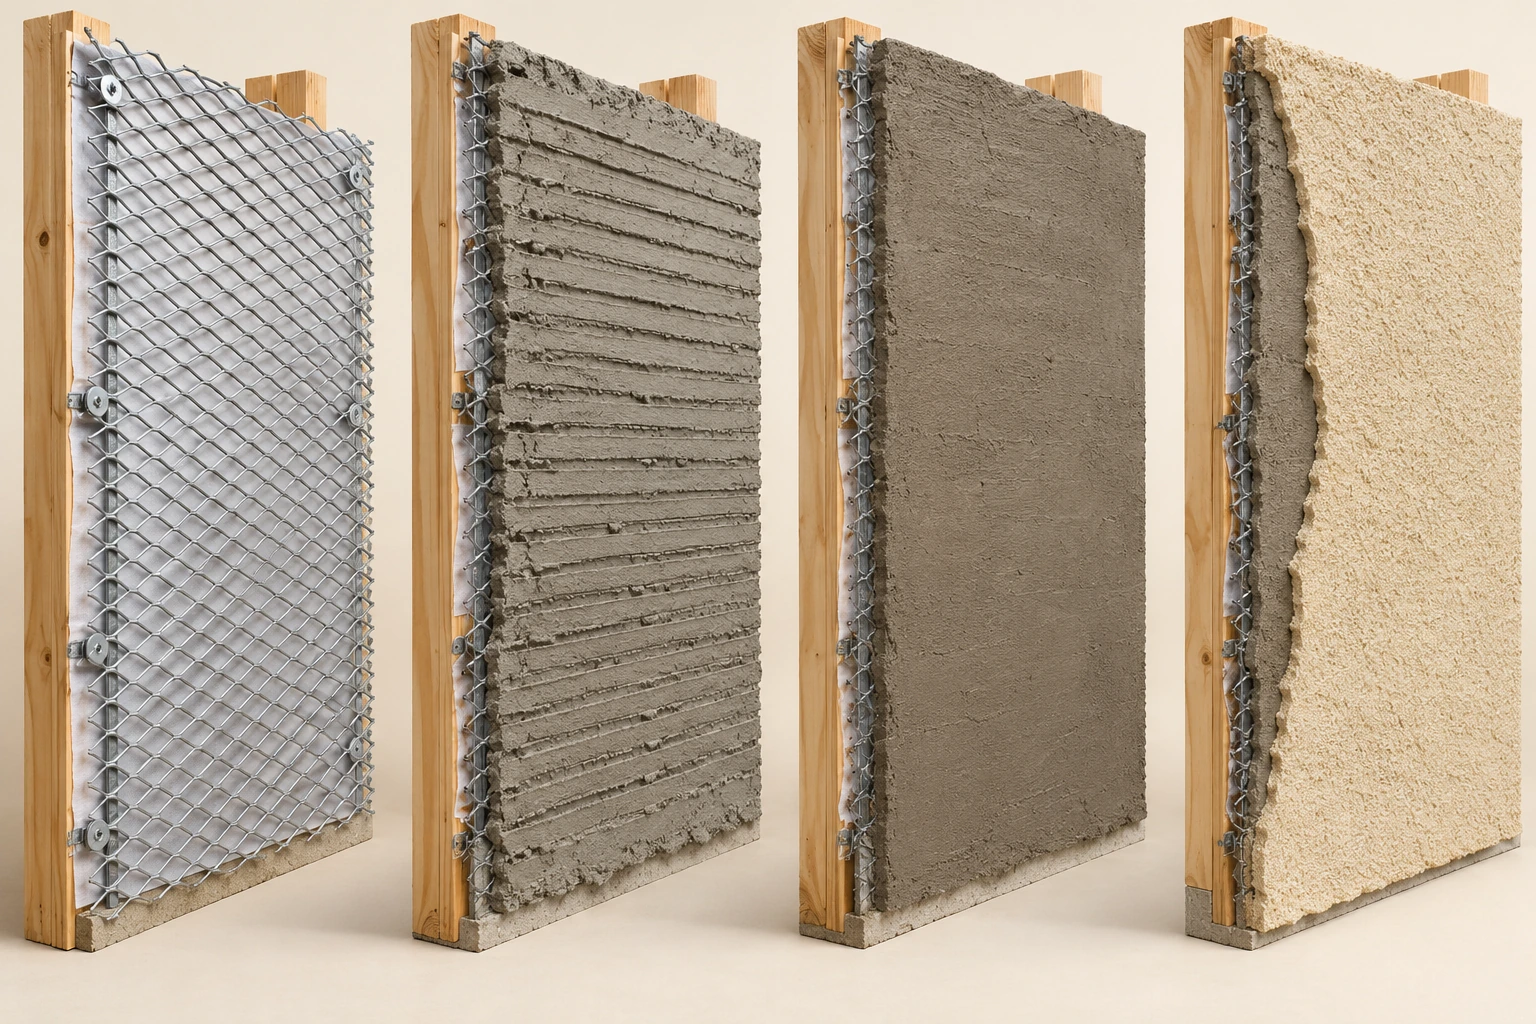
- Scratch layer
The first illustrated cement layer receives a key for the next coat.
- Base coat
The next layer builds the cement surface.
- Finish
The final appearance belongs to the selected finish system.
About this illustration
One traditional three-coat example is shown; other specified systems use different configurations.
Does a sprayed surface tell me the wall was done properly?
Spraying and trowelling are ways of putting particular materials onto a wall. A sprayed-looking texture might be a decorative finish over a prepared base; a named base-coat product may also allow spray application. “It was sprayed” does not identify the layer, the product or the work underneath.
The useful construction question is what is being applied and what supports it. Before the finish hides the base, the contractor can identify the base material, its condition, the intended finish and how openings and joints will be completed. Afterward, photographs of that earlier stage can help explain what the finished surface now conceals.
A finish can look even while a concealed connection is unresolved. Conversely, a partly coated wall can look untidy simply because the job is underway. Compare it with the declared stage and specified finish. Ask about an unexpected thin-looking patch or exposed reinforcement without converting a photograph into a thickness measurement.
The spray illustration shows a material being placed over a prepared base, followed by the resulting texture. It is not a demonstration of equipment settings, application distance, personal protective equipment or owner repair technique. Its purpose is to make the difference between the application method and the finished layer visible.
Application method and finished layer are different questions
The finish is being placed over a prepared base in this example. A spray pattern or trowelled texture tells you how a particular material was placed, not whether every hidden layer and opening connection was completed correctly. Ask which product and layer you are looking at.
Choose a part name to highlight its explanation below.
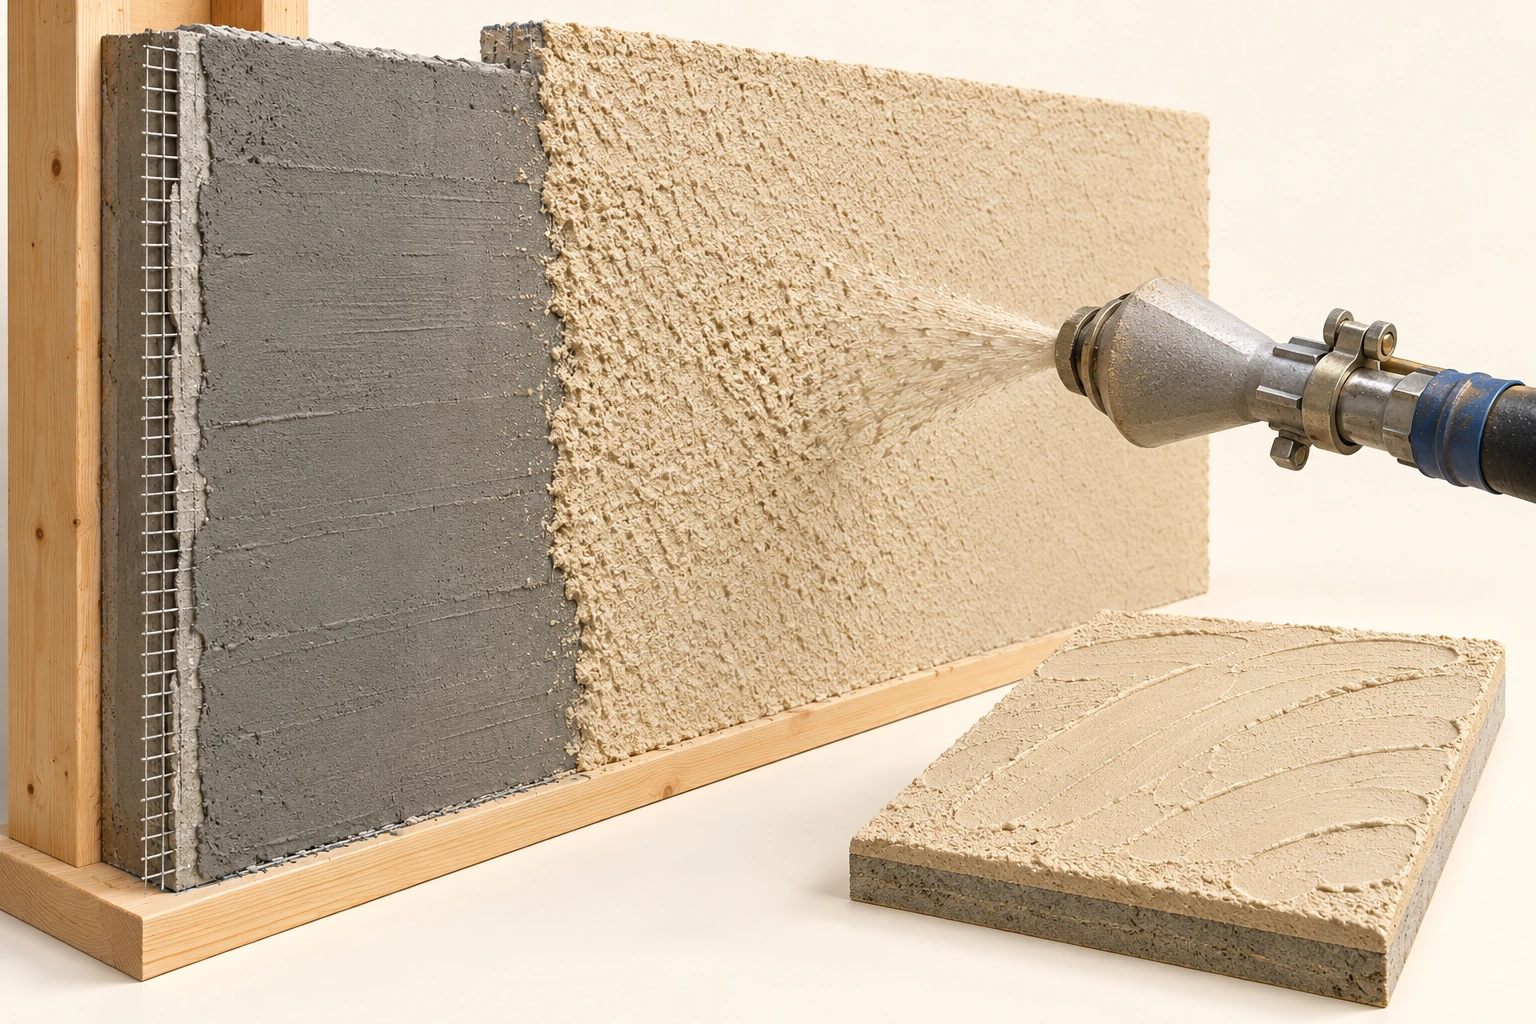
- Application
The illustrated tools describe an application method.
- Surface texture
The resulting texture is the visible outer appearance.
- Wall system
Texture alone does not identify the backing or water-control work.
About this illustration
The nozzle illustrates application method; no equipment settings or owner technique are supplied.
How is EIFS different from stucco over metal lath?
EIFS stands for exterior insulation and finish system. In the named system evaluated by Canada's National Research Council, insulation board sits behind a reinforced base-and-finish coating. The reinforcement is glass-fibre mesh embedded in the base coat. That is a different physical arrangement from the metal-lath cement-stucco example shown earlier.
The thin outer coating, mesh, insulation, water-control layer and their connections are parts of a specified system. A repair that deals only with a visible surface hole may leave a question about damaged insulation or another layer. Identifying the actual system helps the specialist select a compatible repair scope instead of treating all textured walls alike.
The NRC record is useful because it names products and conditions. It is not a certificate for an unidentified house. The current assessment is marked active and modified April 20, 2026; its particular components, substrates and limitations matter. The illustration does not transfer those conditions to every EIFS product or installation.
Older face-sealed EIFS and drained arrangements also need to be distinguished. Alberta Infrastructure's historical bulletin explains these approaches in the context of government facilities. We use it to clarify the water-management difference, not to impose its institutional design preferences on all Canadian houses.
EIFS: reinforced coating over insulation
The EIFS example has a reinforced base-and-finish coating over insulation. Fine glass-fibre mesh is embedded in the base coat; it is a different arrangement from metal lath supporting the cement-stucco example. The house's identified system determines its actual materials and repair details.
Choose a part name to highlight its explanation below.
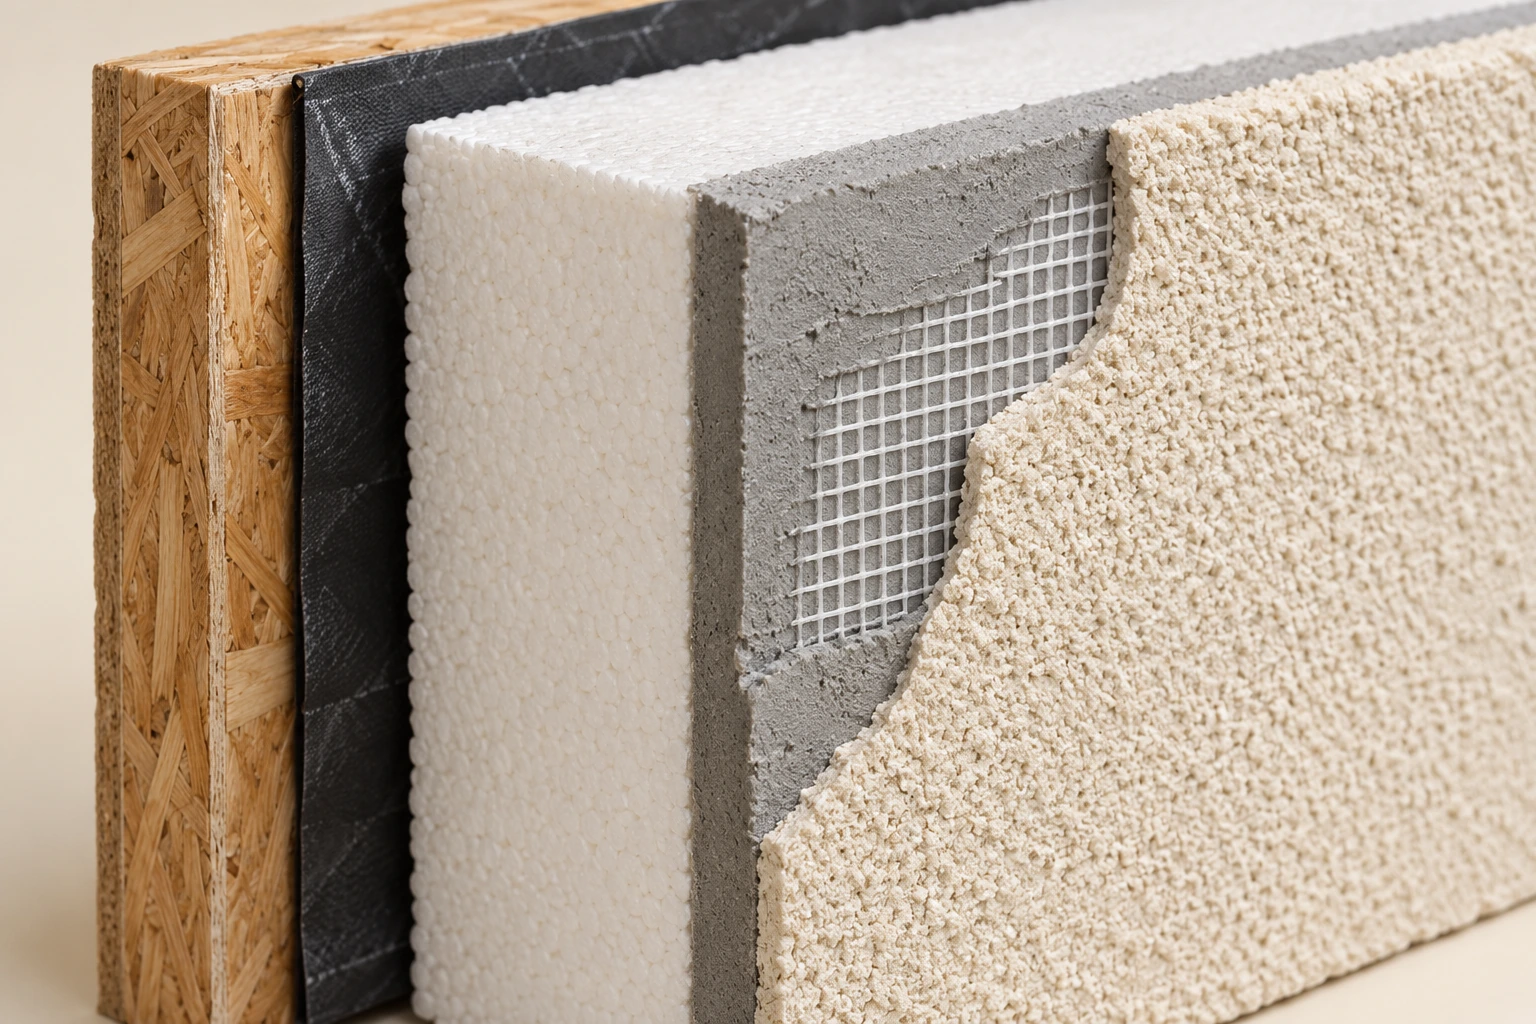
- Insulation
The illustrated EIFS includes a separate insulation layer.
- Reinforcing mesh
The mesh reinforces the base-coat layer.
- Finish
A similar outer texture does not identify all hidden layers.
About this illustration
Identify the actual EIFS system before selecting compatible repair materials.
Where should rain go around a window?
A window interrupts the wall's layers. Water coming down from above needs to be directed away at the head, and the sill needs a planned way to handle water at the bottom of the opening. Flashing is the shaped material that helps redirect that water. Its connection to the surrounding water-control layer matters as much as the metal edge you can see.
Follow the picture from the wall above the window to the head flashing, then outward over its projecting edge. The cutaway also reveals the sill area as a separate part of the opening. Real details must account for the sides and ends as well; water should not simply be handed from one piece to a concealed dead end.
A stain below a window is worth locating and discussing, but its shape alone does not prove the leak route. Water may travel before it becomes visible. Replacement windows deserve particular attention to scope: did the work include the surrounding wall and flashing connections, or mainly the window unit? An invoice naming a new window may not answer that.
From the ground, record the window, the mark and a wider view of the wall. Ask for the relevant construction or repair details and what the inspector could access. Do not climb, remove trim, probe the stucco or spray water at the opening to create your own test.
Water has to pass the opening and return outside
Head flashing redirects water above the window, while the sill area has a separate job at the bottom. The surrounding wrap and connections need to pass water toward those routes. This cutaway simplifies the sides and ends; a visible metal edge alone does not establish the complete concealed connection.
Choose a part name to highlight its explanation below.
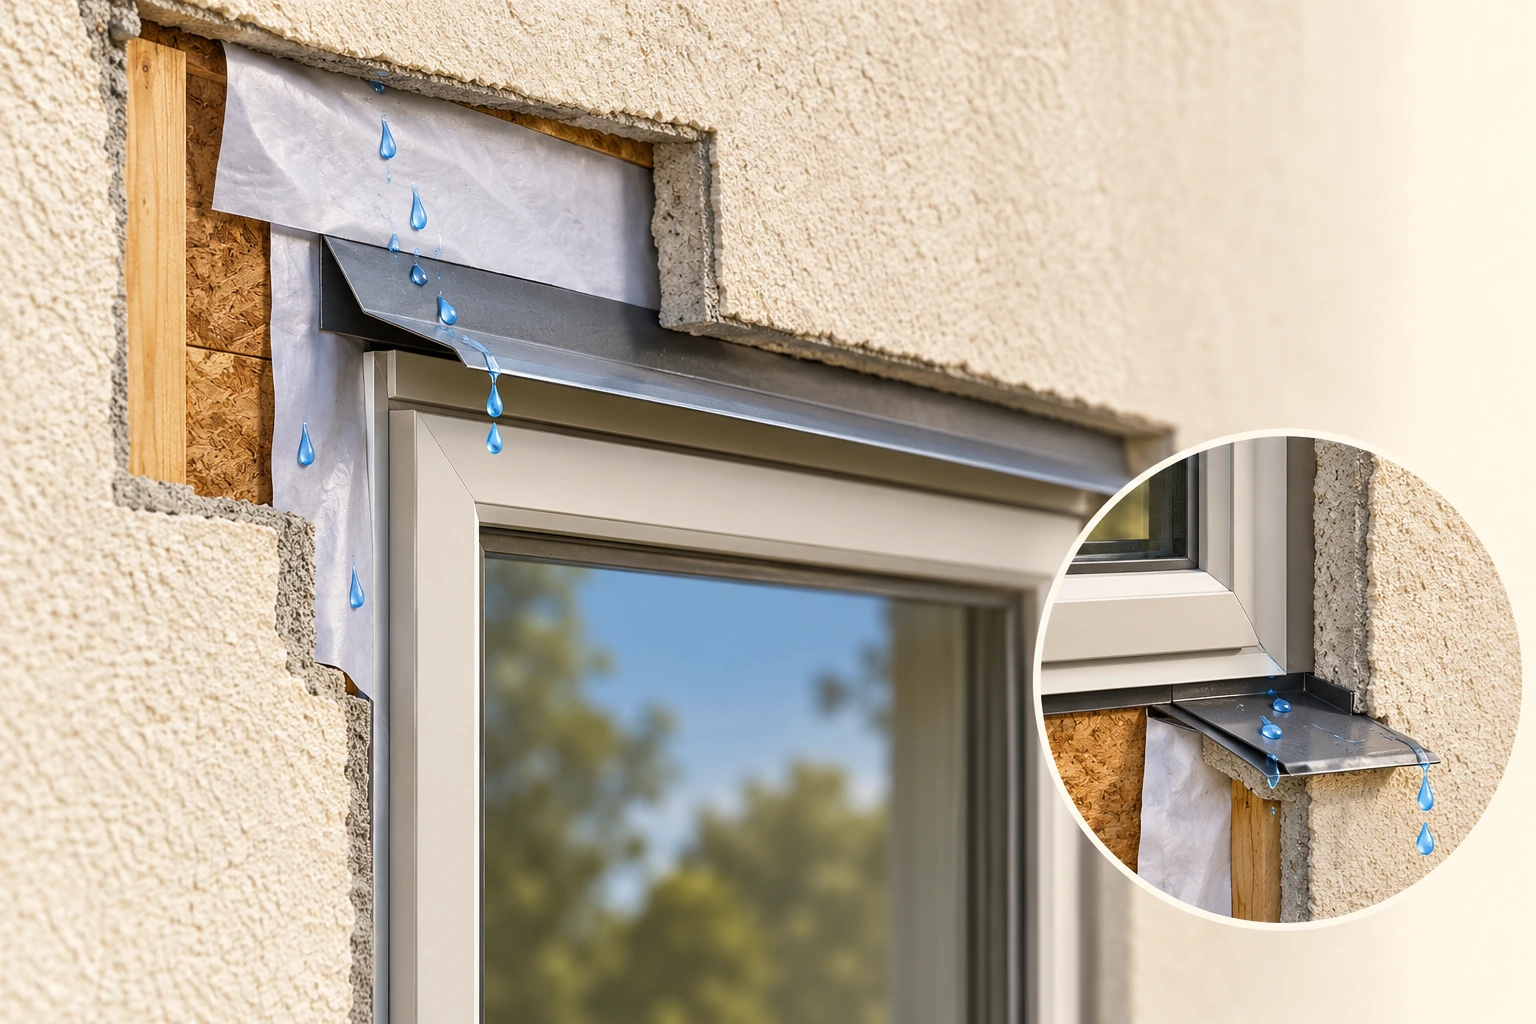
- Window head
The upper opening connection has a water-directing job.
- Sill
The lower opening connection must return water outside.
- Actual detail
The pictured layers are not a universal installation detail.
About this illustration
The sides and ends are simplified; a metal edge alone does not show the whole connection.
How does water leave behind the finish?
A drained wall anticipates that some rain may pass its exterior surface. It gives that water a route back outside. A rainscreen arrangement separates the outer cladding from the backing; the space can help drainage, limit capillary contact and support drying. Capillary contact is the ability of water to move through narrow connected spaces—rather like water wicking into a paper towel.
Drainage and drying are related but different. Gravity can carry free liquid water down to an exit. Moisture left in absorbent materials still has to dry. A cavity that lets water run down is not automatically a guarantee that every part of the wall will remain dry in every season.
Look at the lower wall and transitions in the illustration. The finish stops at a deliberate boundary, and the water route has somewhere to emerge. Those details should be interpreted against the actual design. An unfamiliar slot is not automatically missing sealant; filling an intended exit could interfere with its job.
BC Housing's rainscreen bulletin reports six years of monitoring at five Vancouver multi-unit buildings. It supports the importance of the cavity and interfaces in that setting. It does not set a universal cavity dimension, acceptable moisture reading or national construction detail for your home. Ask how the actual wall manages its local exposure.
Follow one drop to the exit, then distinguish drying
Drainage gives free water a route out of the wall. Drying removes moisture still held in or on materials after that water has moved. The intended gap, exits and actual connections matter to both jobs; this is a conceptual route rather than a cavity-size specification.
Choose a part name to highlight its explanation below.
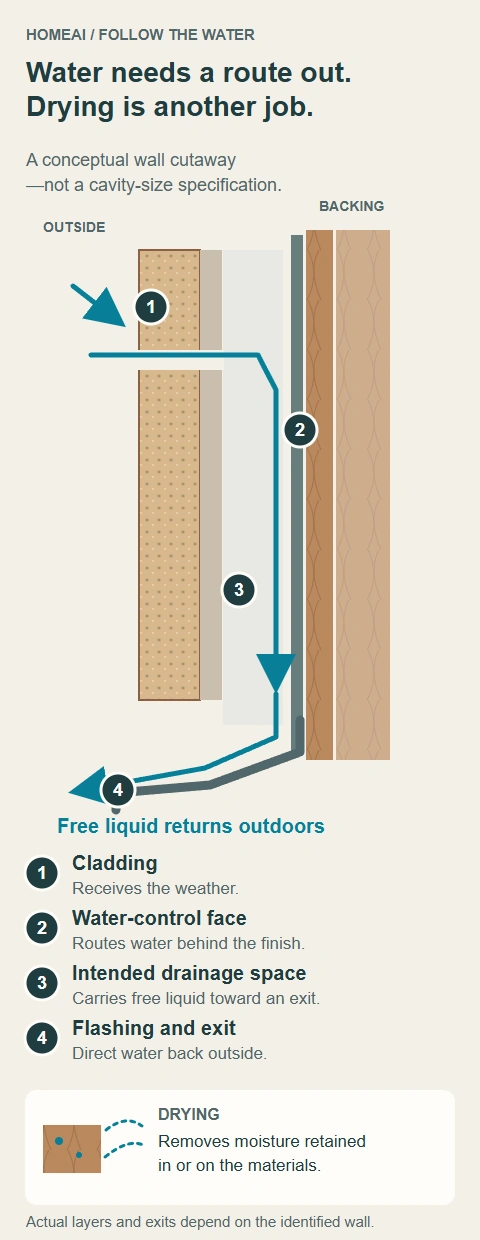
- Outer cladding
Receives the weather and sheds water.
- Water-control face
Routes water that passed the finish.
- Intended exit
Returns free water outdoors.
- Retained moisture
Needs drying, which is different from liquid drainage.
About this illustration
Conceptual route; actual layers and exits depend on the identified wall.
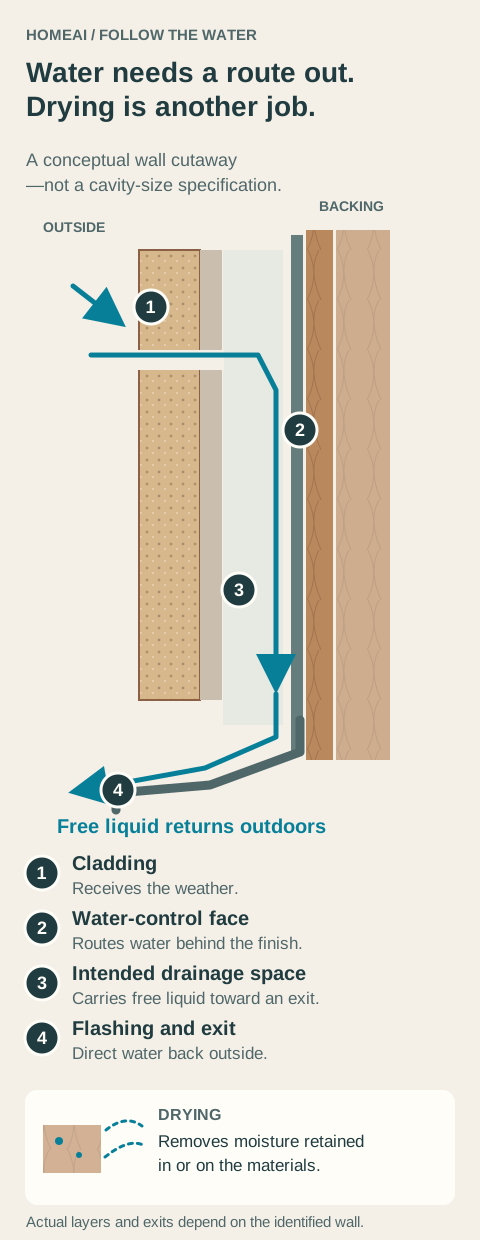
Follow one drop to the exit, then distinguish drying
Drainage gives free water a route out of the wall. Drying removes moisture still held in or on materials after that water has moved. The intended gap, exits and actual connections matter to both jobs; this is a conceptual route rather than a cavity-size specification.
- Outer cladding
- Receives the weather and sheds water.
- Water-control face
- Routes water that passed the finish.
- Intended exit
- Returns free water outdoors.
- Retained moisture
- Needs drying, which is different from liquid drainage.
Read all the diagram text
- HOMEAI / FOLLOW THE WATER
- Water needs a route out.
- Drying is another job.
- A conceptual wall cutaway
- —not a cavity-size specification.
- 1
- 2
- 3
- 4
- OUTSIDE
- BACKING
- Free liquid returns outdoors
- 1
- Cladding
- Receives the weather.
- 2
- Water-control face
- Routes water behind the finish.
- 3
- Intended drainage space
- Carries free liquid toward an exit.
- 4
- Flashing and exit
- Direct water back outside.
- DRYING
- Removes moisture retained
- in or on the materials.
- Actual layers and exits depend on the identified wall.
Which visible changes deserve a closer look?
A useful walkaround looks for changes a buyer or owner can describe: cracks, staining, pieces missing from a finished surface, peeling or separated finish, damaged joints and corrosion at visible metal accessories. Put each observation on a wide photograph before taking a closer image. That way another person can find the same place.
Compare different patterns without treating them as diagnoses. A fine surface crack, a larger opening with missing material and a stained area below a window pose different questions. Cracks can have several causes, including material shrinkage, building movement and stress around changes in shape. One photograph cannot tell you which explanation applies.
An unexpected patch of exposed reinforcement on a claimed finished wall deserves a clear response about what is missing and what work is planned. Ask whether it is a finish-only problem or whether the base and water-control details need investigation. If pieces appear loose or are falling, keep people clear and arrange prompt professional attention rather than standing underneath to inspect closely.
Water entering indoors needs timely attention. Tell the responsible owner, builder or building manager where and when it happens. Safe photographs and weather notes help describe the event; they do not replace the investigation. Avoid pressure washing, coating or covering the area simply to make the mark disappear before its cause has been considered.
The same exposed metal means different questions at different stages
The left wall is waiting for more plaster, with lath deliberately visible. The right wall has an irregular opening in an otherwise finished surface. Ask what stage is complete and why reinforcement is exposed before deciding what work is needed; the illustration does not diagnose the cause.
Choose a part name to highlight its explanation below.
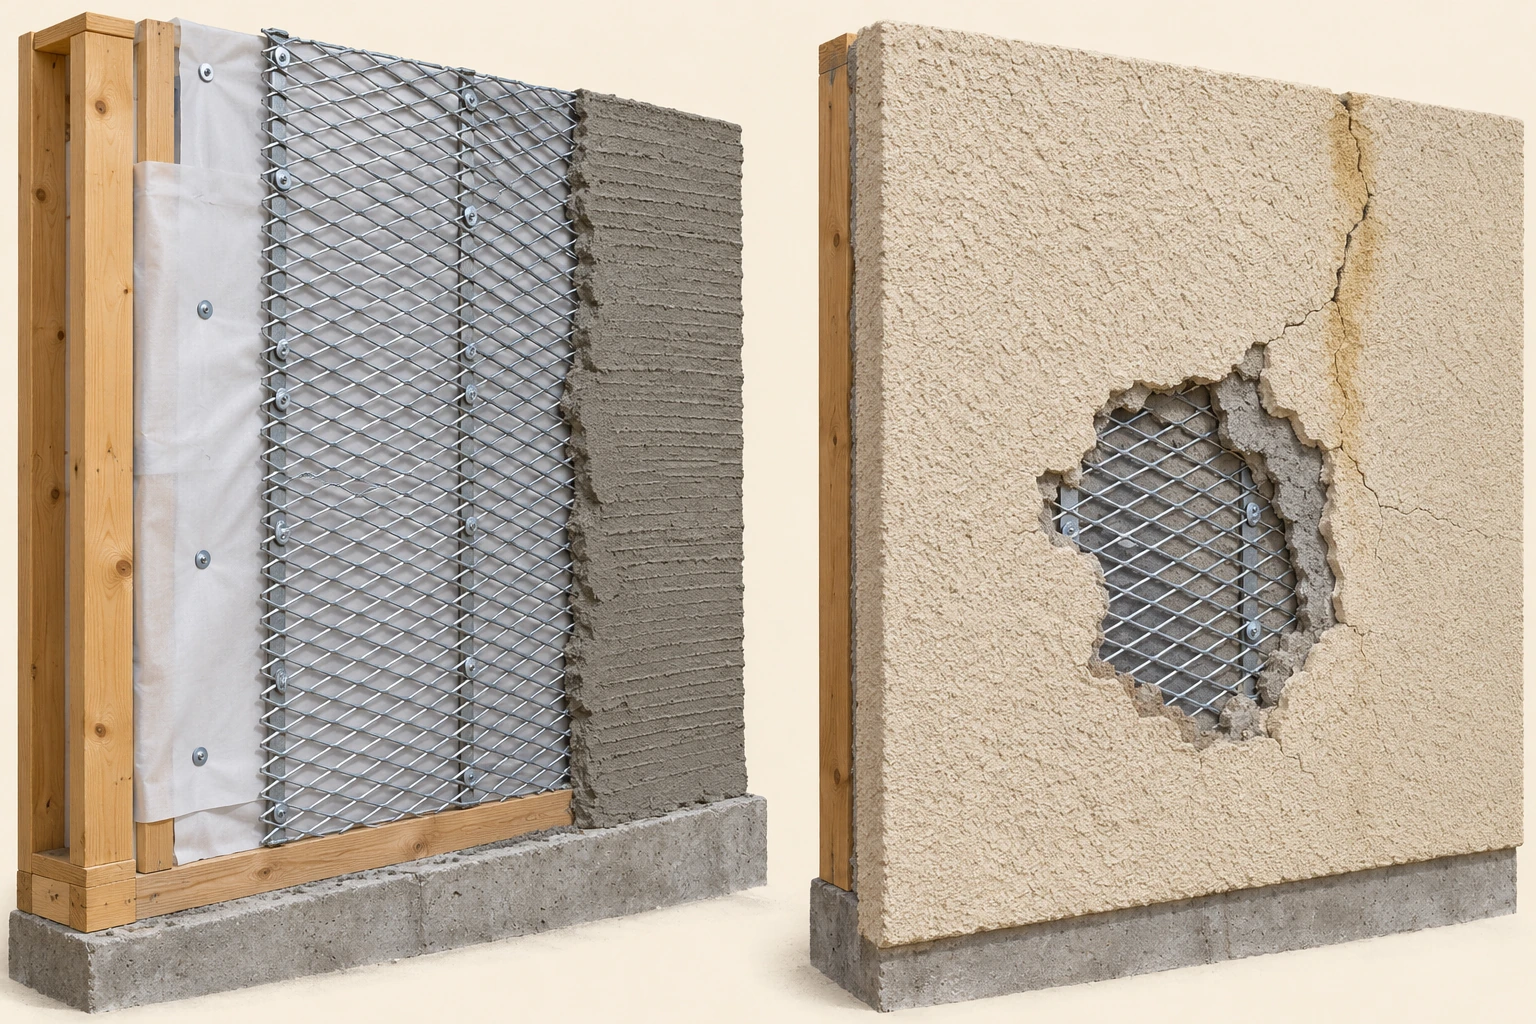
- Unfinished area
The stated construction stage matters.
- Unexpected exposure
Exposed lath on a wall claimed finished needs an explanation.
- Repair question
Ask what caused the loss and which layers need work.
About this illustration
Establish the construction stage and actual cause before deciding on a repair.
When might a surface repair be the right kind of work?
A limited defect in an otherwise sound surface may call for a compatible local repair rather than replacement of a whole elevation. The key is the established condition and the material being repaired. Isolated finish damage is a different starting point from recurrent water entry, loose base material or an opening that reaches other layers.
The repair comparison shows three different depths of work. One deals with a shallow surface defect. Another restores affected base material and reinforcement after a local opened-area assessment. A third addresses a window connection and the water-control layers before the exterior is closed again. Those are alternatives for different findings, not a universal sequence or a quote for your house.
The named manufacturer's small-defect patch product illustrates why a label and its intended use matter: it is a surface repair material with specific limits. That product description does not tell us that an unknown wall needs it, that it suits every EIFS, or that applying it would solve water entering behind a window.
Ask the contractor to explain which layers the proposal covers, why that scope fits the findings and what happens if opening the area reveals more damage. This is more useful than deciding that every crack needs a major reclad or that every crack can be concealed with a tube of filler.
Three repair scopes reach different parts of the wall
The left sample shows a small loss of outer finish. The middle opens deeper to expose metal lath. The window sample at right includes wrap, flashing and a finer white reinforcing mesh. These are different illustrative wall assemblies and repair scopes, not successive stages of one identical installation. The actual findings determine which layers need attention; a smooth final texture alone does not tell you what work was completed.
Choose a part name to highlight its explanation below.
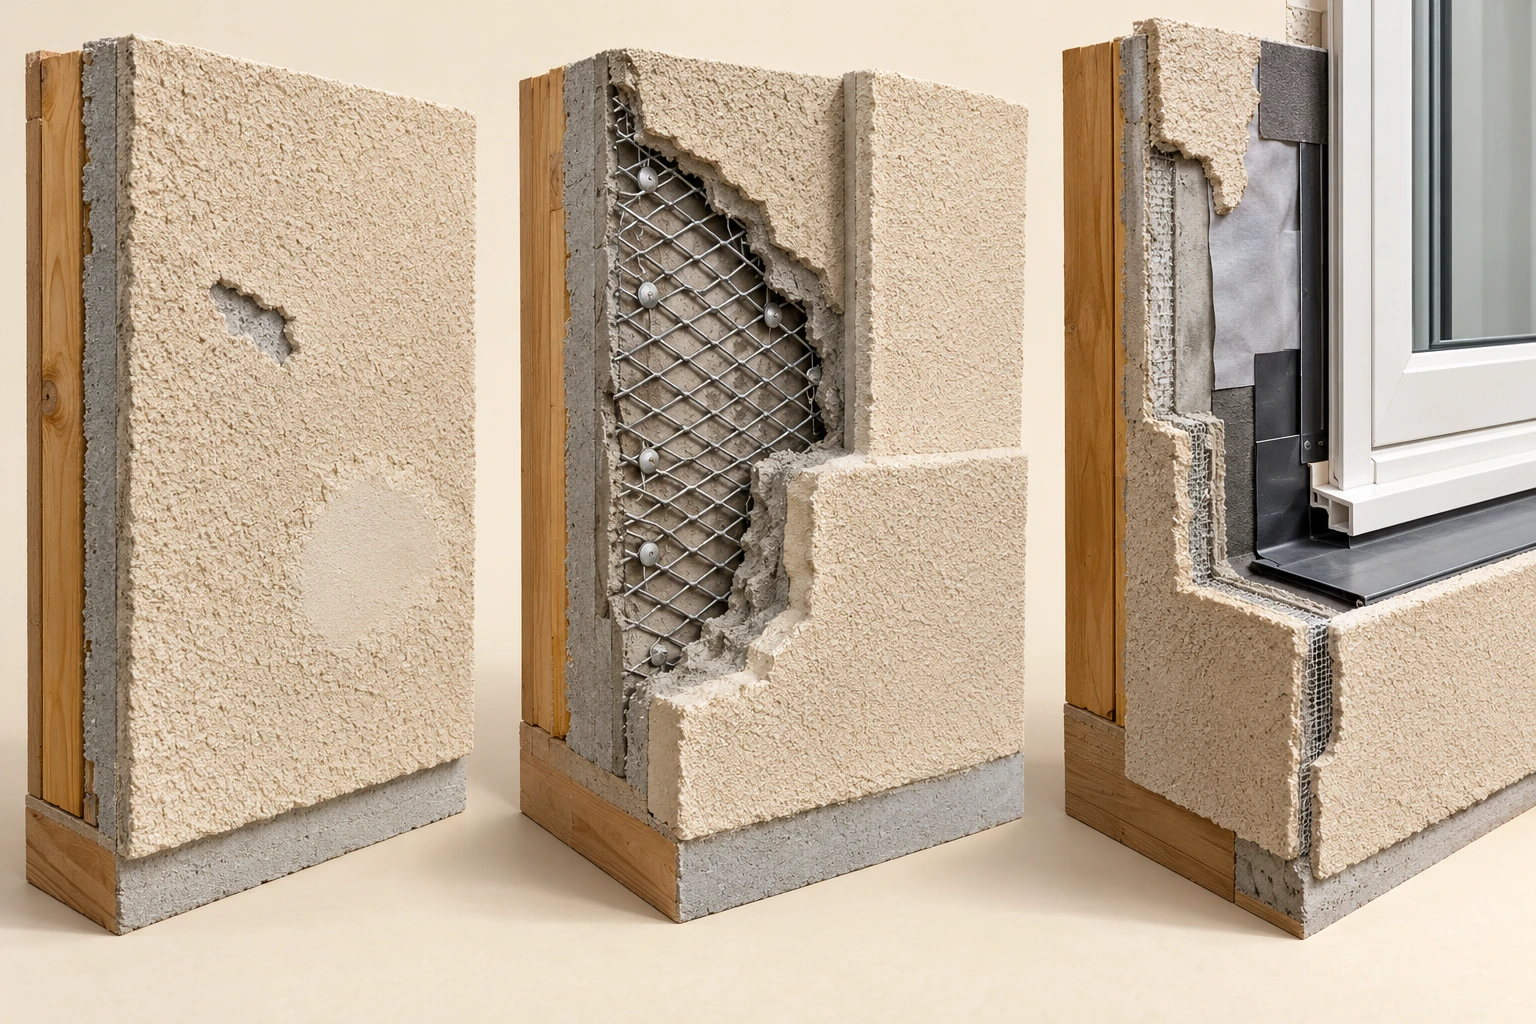
- Finish work
A surface repair addresses the identified finish task.
- Deeper plaster work
A repair may need base or reinforcement work as well.
- Water-control work
An opening or concealed water route needs its own defined scope.
About this illustration
Separate teaching examples, not an instruction to use fine mesh and metal lath interchangeably or a prescribed repair sequence.
Three repair scopes reach different layers
- Limited surface repairThe shallow finish defect identified by the provider. Whether the supporting materials and water-control route are sound.
- Base and reinforcement repairAffected supporting layers in the opened local area. The cause, extent and compatible restoration detail.
- Opening/water-control repairThe actual window or other interface and associated affected layers. How its connections were corrected and what follow-up is appropriate.
These are alternative scopes for different findings, not prescribed steps or a product recommendation.
Further reading: BC Housing — Maintenance Matters 8: Cladding; QUIKRETE — Stucco Patch 8650-32 technical data; QUIKRETE — Scratch and Brown Base Coat Stucco, product 1139-60/-80 technical data.
Why can a repaired patch still stand out?
New finish has to meet an older, weathered surface. Texture, colour, aggregate and the area being worked can affect what you see. A patch may remain noticeable even after appropriate work. That appearance question should be discussed before the repair, with an agreed expectation about the area that will be blended or refinished.
Appearance also needs to be separated from the reason for repair. A beautifully blended patch may hide the location but does not document that a leak path was corrected. A visible colour change does not, on its own, show that a water-control repair failed. Ask what work was done beneath the finish and what follow-up is appropriate.
Coating the whole wall can change its appearance without replacing its backing, reinforcement or flashing. BC Housing specifically cautions against relying on recoating to repair a crack and prevent water entry. If a proposal is mainly a recoat, ask which problems it is intended to address and which remain outside that work.
Keep representative before, opened-stage and completed photographs when they are available. They help separate the visual result from the concealed work. They are most useful when they show the particular wall and opening, rather than a contractor's unrelated example of a good-looking finish.
What should a new-build buyer ask before the wall is covered?
Construction-stage photographs can show parts that the final texture will hide. Ask the builder for available views of the water-control layer around openings, reinforcement or the specified EIFS base, and important wall-to-roof or wall-to-deck transitions. Match them to a location and stage, not just a folder labelled exterior.
If you visit while work is underway, ask what stage is complete and what comes next. Bare mesh before a base coat and exposed mesh after a wall is presented as complete should not receive the same explanation. A straight edge in a sample stage may be intentional; an irregular opening in an otherwise finished elevation needs its own answer.
An inspection record should also be read for its actual scope and outcome. Calgary, for example, describes phased new-home inspections and different possible results, including acceptable with conditions. That municipal process does not mean every concealed cladding detail was photographed or that a general permit status is a separate whole-wall condition report.
Before handover, ask which items remain open, who will address them and what written confirmation will be supplied. Use the home and warranty documents for actual processes and deadlines. This guide does not invent a national stucco inspection stage, warranty period or guarantee for a completed new home.
What should a buyer make of “the stucco was repaired”?
Start with a plain question: “What was wrong, and what did the repair actually change?” The answer should connect the observation, the location, any investigation and the work performed. A document that only says paint or patch may describe a finish task; it may not say whether anything behind the finish was examined.
Look for the elevation or opening involved, the layers affected, the materials used and any findings in the opened area. If the contractor worked around one window, keep that conclusion tied to that window. A neat invoice and a recent date do not expand the job to every elevation of the house.
Ask about repeated symptoms too. Was a stain reported again after the repair, or is there a documented follow-up? Lack of an old complaint in the documents you received is not the same as proof that none occurred. Conversely, incomplete paperwork does not establish hidden damage. It tells you what needs a clearer answer before relying on the repair claim.
For a seller, organize the actual report, scope, photographs and completion documents together. Explain what they cover in ordinary language. A buyer can then discuss any remaining condition or cost uncertainty with the relevant specialist and their advisers without either side inventing a perfect wall or a predetermined major repair.
Turn a wall observation into a specific repair question
A useful repair question starts with a place on the wall. A stain below a window, a missing patch of finish and an intended joint do not automatically need the same response. Ask what was observed at that location and which layers the proposed work includes.
Choose a part name to highlight its explanation below.
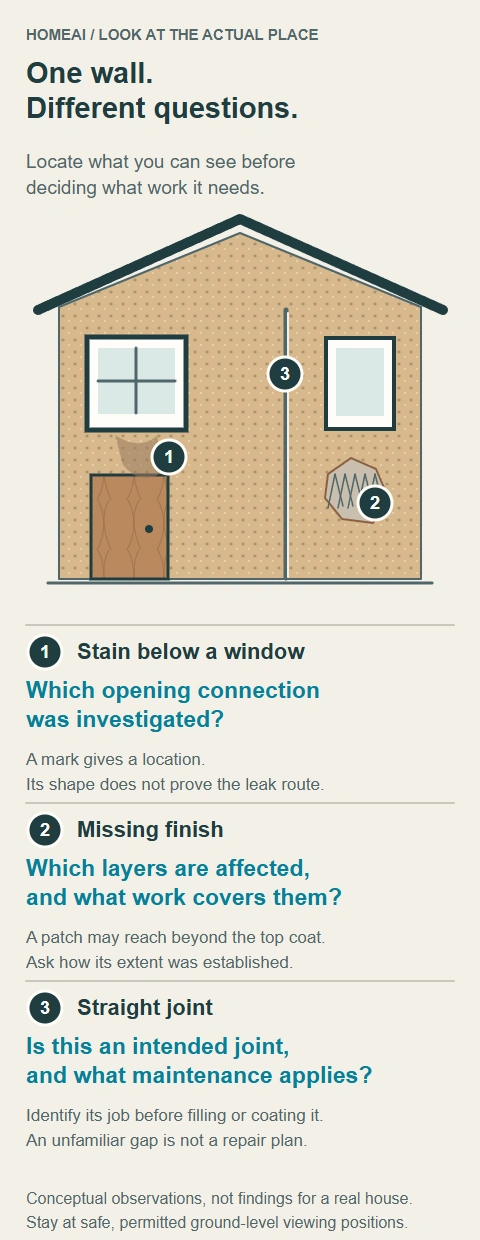
- Window area
Locate the observation before discussing the cause.
- Missing finish
Clarify the affected layers and repair extent.
- Joint
Identify its intended function before choosing maintenance.
- Written scope
Connects the location, findings and actual work.
About this illustration
Locate the actual observation and use a qualified response; the diagram supplies no cause or property finding.
Turn a wall observation into a specific repair question
A useful repair question starts with a place on the wall. A stain below a window, a missing patch of finish and an intended joint do not automatically need the same response. Ask what was observed at that location and which layers the proposed work includes.
- Window area
- Locate the observation before discussing the cause.
- Missing finish
- Clarify the affected layers and repair extent.
- Joint
- Identify its intended function before choosing maintenance.
- Written scope
- Connects the location, findings and actual work.
Read all the diagram text
- HOMEAI / LOOK AT THE ACTUAL PLACE
- One wall.
- Different questions.
- Locate what you can see before
- deciding what work it needs.
- 1
- 2
- 3
- 1
- Stain below a window
- Which opening connection
- was investigated?
- A mark gives a location.
- Its shape does not prove the leak route.
- 2
- Missing finish
- Which layers are affected,
- and what work covers them?
- A patch may reach beyond the top coat.
- Ask how its extent was established.
- 3
- Straight joint
- Is this an intended joint,
- and what maintenance applies?
- Identify its job before filling or coating it.
- An unfamiliar gap is not a repair plan.
- Conceptual observations, not findings for a real house.
- Stay at safe, permitted ground-level viewing positions.
Read a repair claim in plain language
- A coating invoiceWhat finish work and location it names. Was the underlying cause investigated?
- Opened-stage photographsWhat was exposed in the photographed area. Which actual wall/opening and findings do they cover?
- Completion or inspection reportThe stated work, outcome and conditions. What remains outside that scope or still outstanding?
Keep the conclusion tied to the particular work and location. Incomplete records do not establish hidden damage.
Further reading: BC Housing — Maintenance Matters 8: Cladding; City of Calgary — Inspections for contractors.
When is a closer enclosure investigation useful?
A general home inspection can identify accessible conditions and recommend further work. A targeted building-enclosure investigation addresses a narrower unanswered question—for example, why water returns below one opening, whether a proposed patch includes the affected layers, or what an unidentified wall assembly actually contains.
Ask what the specialist proposes to do and what written result you will receive. Visual observations, material moisture readings, diagnostic water testing and selective openings answer different questions. Methods and access should be chosen and carried out by appropriately qualified people with permission, rather than copied from this article.
A reading is a condition at a particular place and time. BC Housing's monitoring work shows why season, material and exposure affect interpretation. An isolated reading should not be turned into a whole-house dry or wet verdict. Where testing or opening is justified, ask how the results will be interpreted with the actual materials and visible findings.
The useful result may be a limited repair recommendation, a broader investigation or a clear statement that a particular area was not accessible. Have the contractor's work scope respond to those findings. A house price, new paint or a confident verbal reassurance cannot substitute for the missing answer.
Why do exposure and renovation plans matter?
Two walls on the same house can receive different weather. Wind, rain, overhangs, height, sun and nearby surfaces change how much water reaches an elevation and how it dries. A sheltered wall is not a direct performance test for the exposed wall around the corner.
Snow and splashback also change the setting at the lower wall. Observe where water collects or is directed and discuss concerning conditions without adding a universal clearance number from a different system. BC Housing's cladding guidance recommends maintenance that suits the actual cladding and warns that inappropriate pressure washing can damage joints and introduce water behind the finish.
A major reclad or insulation upgrade can change more than the outside appearance. Heat, airflow and water-vapour movement work together. Changing insulation or making the enclosure tighter can alter how the house manages moisture and ventilation. Ask the designer to review those relationships rather than selecting a new barrier layer from a simplified picture.
The Canadian sources here cover different places and purposes: general federal house science, coastal-BC monitoring, an Alberta government-facility bulletin and one named-system NRC assessment. Use them to understand the questions. The actual house, local requirements and proposed system determine the project-specific answers.
What are the most useful questions to take to the inspection?
“Which wall system is this, and does it change anywhere on the house?” Start there. Then ask how the water-control layer connects at windows, vents and transitions, and where water behind the finish is intended to leave. If the explanation relies on an old photograph, confirm which wall and construction stage it shows.
“Is this observation expected for the stage, or is something missing from a finished surface?” Use that question for exposed reinforcement, incomplete texture and open repair areas. For a crack or stain, ask what the inspector observed, what remains concealed and whether the next step is maintenance, a defined repair or further investigation.
“Does this proposal restore appearance, repair affected materials, correct a water path—or several of those?” Ask the provider to make that clear. A useful quote should not leave you assuming that a tidy surface means every underlying problem was addressed. Get a response about unforeseen findings before the wall is closed.
You do not need to become a stucco installer to make a better buying decision. You need to recognize the main parts, understand the route water should take and know which question a record or specialist can answer. Keep that explanation, the actual locations and the agreed next work together.
Keep learning about the connected parts
- Inside a new build: the Canadian visual inspection guide
- Read an inspection report without turning it into a guarantee
- Replacement siding: understand the finish and the assembly
- Brick walls: what the layers, openings and stains can tell you
- A sticking window: understand the parts before replacement
- A condo envelope project: what was investigated, contracted and completed?
- Before you list: explain repairs and upgrades clearly
Canadian context and authorities · Visual atlas · Learning labs
Know the parts.
Know what the words mean.
- Cladding
- The exterior-facing material; it is one part of the enclosure assembly.
- EIFS
- Exterior insulation and finish system: identified insulation, reinforced base coat, finish and associated components working together.
- Lamina
- The reinforced base-and-finish coating over insulation in the named EIFS example.
- Rain-management strategy
- The assembly’s intended way of handling rain exposure and water that passes the exterior.
- Drainage
- A route that lets free liquid water move out of the wall.
- Drying
- Removal of moisture remaining in or on materials after free water has drained.
- Interface
- A connection at an opening, penetration or transition between assemblies.
- Investigation scope
- The question, locations, methods and limitations included in a professional review.
- Wrap
- A water-control layer behind the cladding; a real system may use a sheet membrane or a specified coating.
- Metal lath
- A metal reinforcement/support with openings that allow cement plaster to key around it.
- Scratch coat
- The first base coat in the illustrated three-coat cement-stucco example, surrounding the lath and scored for the next coat.
- Brown coat
- The second base coat in that example, building and levelling the surface before finishing.
- Finish coat
- The exposed coating that gives the selected texture and colour over the prepared base.
- Flashing
- A shaped water-directing component at a junction such as the top or bottom of an opening.
- Reinforcing mesh
- In the named EIFS example, glass-fibre fabric embedded within the base coat; different from the metal lath in the cement-stucco illustration.
- Rainscreen
- An arrangement with cladding separated from backing so the intended space and connections can assist rain management, drainage and drying.
- Repair scope
- The actual locations, layers, findings and work included in a repair—not simply its finished appearance.
Questions to bring
to the conversation.
- Which actual wall system and construction period are identified here?
- Is this area unfinished, or is reinforcement unexpectedly exposed through a claimed finished surface?
- How do the wrap, opening details and intended drainage exit work together?
- Does the repair address appearance, affected base materials, a water-control connection—or more than one?
- What locations and concealed areas remain outside the inspection or investigation?
Separate a showing observation, an existing record and a new professional assessment. Unknown means a question remains; it does not automatically mean a defect.
Use the evidence planner ↗Go to the source.
Original HomeAI explanation informed by these public references. Sources support the underlying guidance; they have not reviewed or endorsed HomeAI. Diagrams are conceptual, and calculator outputs depend on your inputs.
The primary readings cover BC Housing maintenance and coastal-Vancouver monitoring, a historical Alberta government-facility EIFS bulletin, the current named-system CCMC 12416-R assessment and bounded manufacturer stage/repair sheets. They explain mechanisms and work scope rather than a national layer specification or an approval of an installed house.
Publication & source review
First published .
Sources reviewed .
- BC Housing · Maintenance Matters 8: Cladding
Where this reference applies
Jurisdiction: British Columbia; residential cladding maintenance context
Source reviewed: 2026-10-03 · UTC
Fresh retained five-page PDF. Visible edition February 2018, copyright 2020. Bounded pages 1–2, page 3 cementitious-stucco definition, and pages 4–5: finish versus assembly, rain-control approaches, interfaces and renewal scope. Regional maintenance tables and warranty-law text are not adopted as national intervals or legal advice.
- BC Housing · Builder Insight 6: Rainscreen walls
Where this reference applies
Jurisdiction: British Columbia; six-year monitoring of five Vancouver multi-unit buildings
Source reviewed: 2026-10-03 · UTC
Fresh retained nine-page PDF, edition February 2018. Pages 1–3 and 5–6: cavity functions, vulnerable interfaces, drainage versus drying. The study is regional and historical; its measurements, gap dimensions and material thresholds are not national design rules or a property diagnosis.
- NRC · CCMC 12416-R: named EIFS evaluation
Where this reference applies
Jurisdiction: Canada; evaluation of specified StoTherm ci products under listed conditions
Source reviewed: 2026-10-03 · UTC
Fresh retained registry page: status Active, issue August 12, 1992, modified April 20, 2026. Product description, substrate boundary and conditions only. Named WRB, insulation and reinforced lamina illustrate system identification; the evaluation does not certify an unidentified wall or actual site installation. No component recipe, dimensions, fire rating or universal approval inference.
- NRCan · Keeping the Heat In: enclosure functions
Where this reference applies
Jurisdiction: Canada; federal general building-science education
Source reviewed: 2026-10-03 · UTC
Fresh retained page, visible modified January 14, 2025. Sections 2.1.7, introductory 2.2, 2.3.1 and 2.4: heat, airflow, vapour and liquid-water functions are related but distinct. No generic retrofit layers, installation procedure or current adopted-code specification.
- NRC · Stucco-clad wall hygrothermal research, 2017
Where this reference applies
Jurisdiction: Canadian research; modeled wall configurations in three Canadian climate locations
Source reviewed: 2026-10-03 · UTC
Fresh retained publisher-version PDF, cover publication September 1, 2017; DOI 10.1520/STP159920160100. Abstract and study-input/method context only: moisture response depends on configuration and climate assumptions. NBC 2010 references are historical; no simulated mould index, cavity dimension, universal durability promise or present-day code rule is adopted.
- BC Housing — Maintenance Matters 8: Cladding
- BC Housing — Builder Insight 6: Rainscreen walls, field monitoring and performance in BC
- Alberta Infrastructure — Design & Technology Series 05: EIFS assemblies, face-sealed versus drained systems
- NRC — CCMC 12416-R, named StoTherm ci evaluation
- QUIKRETE — Scratch and Brown Base Coat Stucco, product 1139-60/-80 technical data
- QUIKRETE — Stuccoing systems project sheet
- QUIKRETE — Stucco Patch 8650-32 technical data
- QUIKRETE — Stucco Patch product page
- NRCan — Keeping the Heat In, section 2: How your house works
- City of Calgary — Inspections for contractors
Have a question about your home?
Start with the symptom, timing and what you have observed.
Ask HomeAI